SmartWOP comes with a pre-installed selection of connectors. You can anytime create new connectors.
Using the example of the screws, these instructions explain how this works.
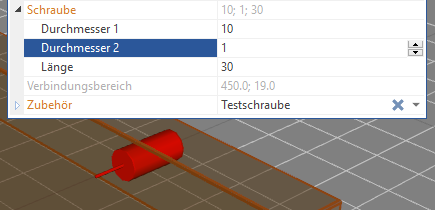
Now the template for screws opens (Templates have a red stripe on the left/ properties of already set connectors have no stripe and only apply to the selected object, while templates apply to all objects of this type)
The first thing to do is to get a new one Surname be given. For this in the column Accesories replace the existing name.
The columns supplier and item number are optional. Bolts are defined in SmartWOP by the holes - these now need to be adjusted.
The diameters explain themselves like this diameter 1 is the hole through the first plate, diameter 2 the hole in the second plate.
Here in the example unrealistic but clear.
If you only want to drill in the first plate, you can set diameter 2 to 0.
Your new bolt is now defined and ready to be used and selected from the drop down menu.
However, this connector can now be changed at any time. This can be a problem especially when different users are working on SmartWOP.
There is that admin mode.
Switch up File>Options>General and put a tick admin mode and confirm with below Apply.
If you now create a new connector as described above, you will see the connector name opened lock is shown.
This means you now have the right to edit this connector. As soon as you are finished with your settings and have created all connectors, you can use the admin mode by removing the tick in the options or by restarting SmartWOP. If you now look at the connector in the list, it will be marked with a closed lock displayed.
Connectors displayed with the lock cannot be changed – except in administration mode. If a change is made, SmartWOP will automatically make a copy of the connector. This copy is then sent with a * marked.
This can prevent your default connectors from being overwritten while still allowing everyone to continue working at any time.


